Jasmine Testing
Testing our JS code
© We Can Code IT, LLC
Testing in JavaScript
We have seen testing in Java already with Junit. We are going to be using the same sort of behavior to test drive our JS with Jasmine.
Jasmine
Jasmine is a stand alone JS testing suite. There are other JS testing suites that are used more frequently now inside of the Node.js environment such as Mocha or Jest. We use Jasmine because it doesn't require any sort of environment to run but can be used in any sort of build system you find yourself in. It's a great starter test suite to learn TDD in JS.
The first step is to download Jasmine. Navigate to The Jasmine Download site and download the current stable release (3.1.0).
After downloading, rename the directory something more appropriate for your project, add a css and js directory to src as well as a js directory to spec. Also add an index.html file to the root directory. Your project directory should be structured like this now:
my-project
|- lib
|- src
|  |- css
|  |- js
|
|- spec
|  |-js
|
|- SpecRunner.html
|- index.html
Naming Conventions
Similar to naming our tests in Java, there are conventions for how we should name our JS and JS tests. Like Java, your test files should mirror your application files so when we add a file to src/js we should add a file named the same thing (with .spec.js as the file type) inside of the spec/js directory. For example if we add src/js/app.js we should also have a spec/js/app.spec.js. So your directory should now be structured like this:
my-project
|- lib
|- src
|  |- css
|  |- js
|     |-app.js
|
|- spec
|  |-js
|    |- app.spec.js
|
|- SpecRunner.html
|- index.html
SpecRunner
Jasmine runs your tests for you using the SpecRunner.html file. So first we need to add our application code and our test code to SpecRunner:
<!DOCTYPE html>
<html>
  <head>
    <meta charset="utf-8" />
    <title>Jasmine Spec Runner v3.1.0</title>
    <link
      rel="shortcut icon"
      type="image/png"
      href="lib/jasmine-3.1.0/jasmine_favicon.png"
    />
    <link rel="stylesheet" href="lib/jasmine-3.1.0/jasmine.css" />
    <script src="lib/jasmine-3.1.0/jasmine.js"></script>
    <script src="lib/jasmine-3.1.0/jasmine-html.js"></script>
    <script src="lib/jasmine-3.1.0/boot.js"></script>
    <!-- include source files here... -->
    <script src="./src/js/app.js"></script>
    <!-- include spec files here... -->
    <script src="./spec/js/app.spec.js"></script>
  </head>
  <body></body>
</html>
Including JS in Code
So now that we're testing our JS code, we can include our app.js file in our application:
<!DOCTYPE html>
<html>
  <head>
    <meta charset="utf-8" />
    <title>My Application</title>
  </head>
  <body>
    <script src="./src/js/app.js"></script>
  </body>
</html>
Now we can begin our TDD process! Time to add stuff to app.spec.js
Describe
The first function we need to look at in Jasmine to begin our testing is describe(suite-title, callbackFunction() {}). This is what allows us to set up actual tests inside of our Jasmine testing environment.
// ./src/js/app.js
function addTwoNumbers() {}
// ./spec/js/app.js

describe("addTwoNumbers", function() {
  // Our individual tests go here
});
So we want to mirror our src directory with a spec directory. This helps us keep our code organized.
Nesting Describe Functions
We can nest describe() functions to keep our code organized. For example:
describe("My Application", function() {
  describe("addTwoNumbers", function() {
    // tests that assert behavior about the `addTwoNumbers` function
  });
  describe("someOtherFunction", function() {
    // tests about `someOtherFunction()`
  });
});
This way we know all tests in this block are related to the addTwoNumbers function and it's in the context of our Application. (You'll see why this is preferred when you see how Jasmine tests display)
It
The next function we need for our tests to run is it('defines behavior we expect', callbackFunction() {}). This callback function is whats actually going to accept another function that is going to do the actual testing.
describe('addTwoNumbers' function() {
    it('returns \'3\' when given \'1\' and \'2\' as parameters', function() {
        // Actual test goes in here
    });
});
One more step and we're ready to actually run a test.
Expect
The last function we need is expect(functionWeAreTesting(params)). This accepts methods chained to it to check against the return value of our function.
describe("addTwoNumbers", function() {
  it("returns", function() {
    expect(addTwoNumbers()).toEqual(1);
  });
});
Other values for expect() (There are way more than this. See docs):
.not.someAssertion(someValue) // negates assertion.toBe(boolean).toMatch(regex).toBeDefined().toBeNull().toContain(value)
Expect has many methods on it that we can chain to test results on.
Running Tests
We can now navigate to SpecRunner.html in our browser. This will run all of the JS code that we attached and show you how your tests are behaving. Let's see that in action.
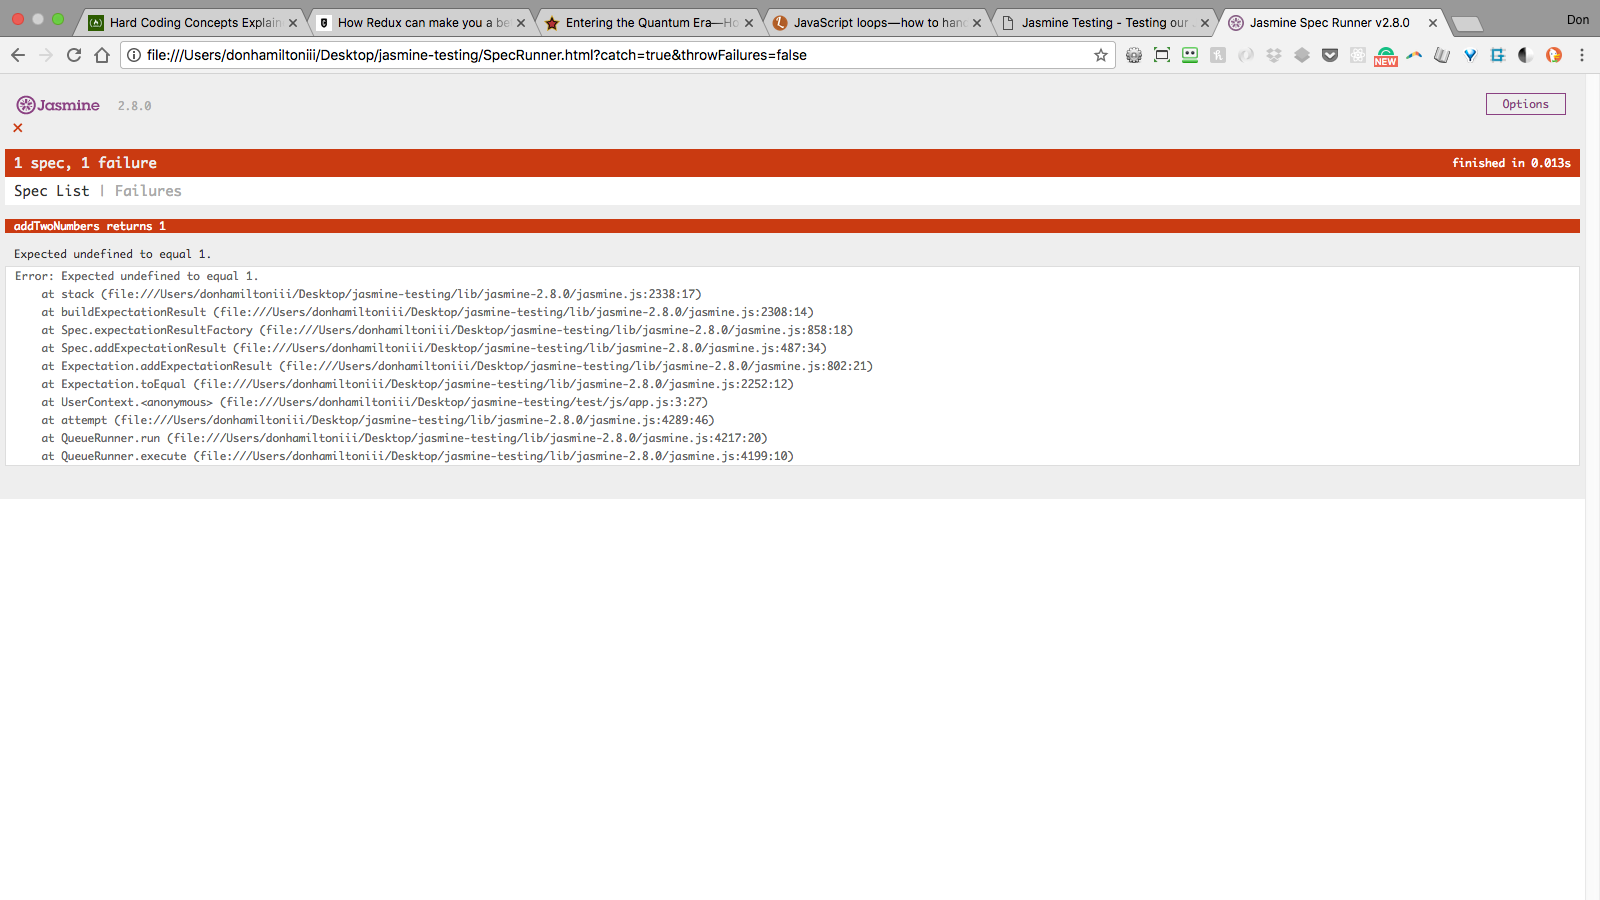
Failure
Our tests are failing! Yay! Well, not really. But this does mean that our test suite is set up! That means it's time for…
Practice
You now have a powerful tool available to you in Java as well as JS. You can use TDD to make sure your code is doing what you want. This testing suite will work with any framework you're using as well. Clone the exercise here.